CHAPTER 3: GETTING STARTED WITH THE KEYBOARD
The following work should be done at a keyboard. If you do not have one in your home, try to get access to one (schools, churches, relatives, friends?), or buy one of the inexpensive electronic keyboards that can be found in most large department stores or are available online, or use one of the virtual keyboards that are available online. A link to one is presented below:
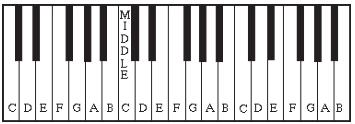
A picture of a keyboard is presented below, but look at your own keyboard as you work through the next two examples, or toggle back and forth from this document to your virtual piano. The keyboard depicted in the following examples is shortened to include only 36 white and black keys, ranging from a low C to a high C, compared to a full-size piano, which has 88 white and black keys, ranging from a low A to a high C.
FIG. 5
Every keyboard has black and white keys which can be described as different note-names, and which create the musical sounds we call pitches. The first seven letters of the alphabet are used to represent the seven note-names used in music, ABCDEFG, and they are assigned to the white keys on the keyboard as shown above. Notice the repeating alternation between groups of two and three black keys.
Find this sequence of seven note-names on your own keyboard ‐ABCDEFG‐ and notice that the pattern repeats several times over the whole keyboard. Notice that as you move from left to right on the keyboard, the musical alphabet ascends and repeats but the pitches of the notes sound higher and higher12. You will also notice that as you move from right to left on the keyboard, the musical alphabet descends, and the pitches of the notes sound lower.
There are three interconnected processes to be demonstrated. The first process has to with your finger, which starts from the lowest white note on the extreme left of the piano and gradually moves to the highest white note on extreme right playing every white key.
This process of gradually moving up from the lowest white key correlates with the pitches, which begin very low and gradually climb higher and higher. The process of moving from left to right on the piano also connects to the noteheads in the notation, which get higher and higher, reflecting the relative highness of the pitches as you move from the extreme left to the extreme right on the keyboard.
FIG.6
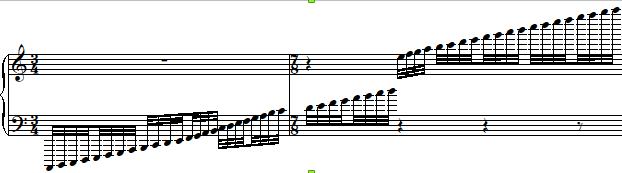
Compare these three processes:
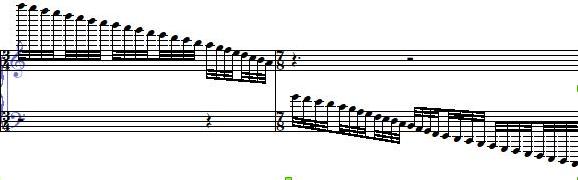
These three interconnected processes also happen in an opposite ways as your finger moves from the white key on the extreme right of your keyboard down to the white key on the extreme left. The finger moves from extreme right to extreme left (instead of left to right), the noteheads go down (instead of up), and the pitches go from very high down to very low (instead of from very low up to very high).
FIG.7
REVIEW
Moving to the right on the keyboard is connected to going up in pitch and going up in the notation. Moving to the left is connected to going down in pitch and going down in the notation.
Find the seven note-names at your own piano‐ABCDEFG ‐ and notice that the pattern repeats several times over the whole keyboard. Notice also that as you move from left to right on the keyboard, the musical alphabet ascends and repeats as the pitches of the notes sound higher and higher. You will also notice that as you move from right to left on the keyboard, the musical alphabet descends, and the pitches of the notes sound lower.
FIG.8
Traditionally, students are taught where middle C is. It is the C nearest the name of the piano maker on a full-sized, non-electronic piano. This note, along with a few notes on either side of it, can be sung by all four voice parts: soprano, alto, tenor and bass.
Study your keyboard and learn how to find all of the C's, which are always just to the left of the groups of two black keys. Once you have memorized where C is, it is not difficult to memorize the locations of the other six note-names.
Each piano key has white or black keys on either side of it that are called adjacencies. The black keys can be thought of as modifications of the white keys: their note-names are derived from the white keys . For example, the black keys on either side of the white key D can be said to be adjacent to D, and they are shown in the figure below.
FIG.9
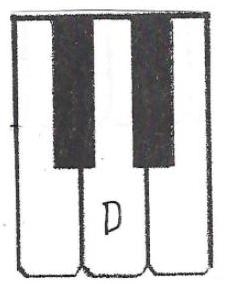
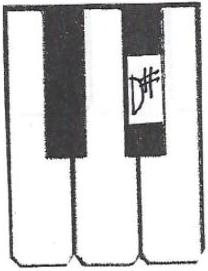
If you add the sharp sign ‐#‐ to a note-name, you move up (left to right) from that white key to the adjacent black key, as illustrated below. You move from the white key, D, to the black key, D#.
FIG.10
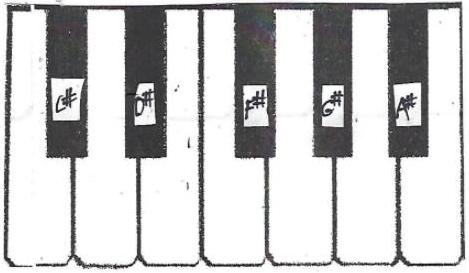
For five of the seven note-names, C, D, F, G and A, the next adjacent key up is a black key, as illustrated below.
FIG.11
If you add the flat sign- ♭ -to a note-name, it lowers the note and you move from the given white note down (right to left) to the next adjacent key. For five white notes, D, E, G, A and B, the next adjacent note down is a black key.
FIG.12

If you add a sharp to either B or E, notice that you move up to the next adjacent white note. In this way, B# is found on the same piano key as C, and E# is found on the same key as F.
FIG.13
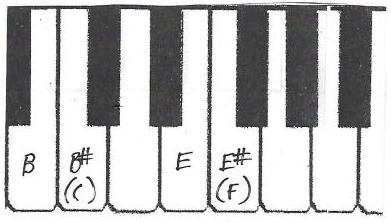
B# and C, and E# and F are said to be enharmonically equivalent because they represent two different ways of spelling, or describing the same pitches or keys on the keyboard.
In the same way, F♭ and C♭ are enharmonic equivalents of, respectively, E and B.
FIG.14
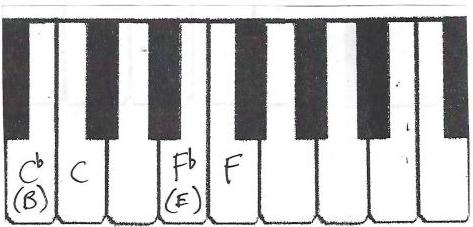
To help organize this aspect of the system in your mind, remember that sharp and flat notes can also be found on white piano keys, but black piano keys always correspond to note-names with a sharp or a flat in their names.
You also need a way to nullify sharps or flats and to return modified notes back to original unaltered form. This is done by the use of the natural sign-♮ ‐which cancels the preceding sharp or flat. The system is actually more complex because there are also double-sharps (𝄪) and double-flats (𝄫), but that information is not essential at this point.13
EXERCISE 1
Go to your piano and find, name, and play the 21 note-names listed below over the entire keyboard:
Ab A A# Bb B C C# Db D D# Eb E F F# Gb G G#
EXERCISE 2
Make a list of all the note-pairs that are enharmonic equivalents,14 e.g., Ab and G#, A# and Bb, etc.
EXERCISE 3
Look at the keyboard below that has been marked with singing ranges for men and women's voices.
FIG.15
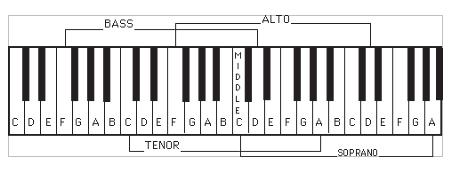
Understand that if you are asked to "play a note on the piano," you select either a white or a black key, and to press that key down to create the sound of that particular note. Play a note within your own range and sing back the same pitch on "la" or "lu." Remember to keep your head and back straight, your shoulders low and relaxed, and the back of your throat open, as if you are going to yawn, and try to remember to breathe from beneath your chest. This exercise is called "matching pitch," because you are being asked to match or imitate the notes you play on the piano with your singing.
Do not be discouraged if you have difficulty with the first exercise. The key to success is relaxed and careful listening. Take plenty of time to listen to each pitch as it rings on the piano. Let it play back in your imagination before you try to sing it back, the way you "hear" your favorite song in your head. It also helps a great deal to do this work with someone else. Sliding your vocal pitch may up or down might help you find the right pitch, as might using an electronic tuner.
More experienced musicians will move quickly through these exercises. If you find them easy, invent your own more challenging exercises: e.g., play two or more notes in succession on the piano and sing them back.
You have to absorb a good deal of information to recognize the connection between the little dots printed on the paper and the white and black keys on the piano. Once you make this connection, you can sit at the piano, find all the notes of your music on the keyboard, play them and sing them back, provided you have mastered the pitch-matching skills offered in the exercises above.